
Build a MCP Server for AI Access to UniFi Networks (Goose or Claude)
In just a few minutes you can create your own local MCP server and control your UniFi network with AI agents like Goose and Claude.

UniFi networking gear is great. It also exposes a very basic REST API, which still provides some neat information about our UniFi networks, devices, and connected clients.
I recently gave my home network a fresh makeover with UniFi hardware and came across this API. But I’m also a data & AI maker nerd.
Today, in just a few minutes, we’ll see how to build our own MCP server implementation that runs locally on your machine and uses the local UniFi API. This will let you talk to your network using modern AI Agents like Goose and Claude to unlock natural language access.
Setup / Prerequisites
Create an API key for accessing the UniFi Network API
Go to your UniFi console at https://unifi.ui.com
Go to Settings » Control Plane » Integrations and click Create API Key
Install uv which we’ll use for managing the Python project.
Create Project Structure
Next, we’ll initialize the project/codebase with a few simple commands:
uv init mcp-server-unifi
cd mcp-server-unifi
uv venv
uv add "mcp[cli]" httpx requests
uv will also create a `hello.py` file which we don’t need so you can delete that.
rm hello.pyImplementing the MCP Server
Let’s begin the implementation by importing some needed modules and defining environment variables for configuration.
# File: main.py

from typing import Any, List, Dict, Optional
import os
from mcp.server.fastmcp import FastMCP
import requests

# Configuration
UNIFI_API_KEY = os.getenv("UNIFI_API_KEY", "YOUR_API_KEY_HERE")
UNIFI_GATEWAY_HOST = os.getenv("UNIFI_GATEWAY_HOST", "192.168.1.1")
UNIFI_GATEWAY_PORT = os.getenv("UNIFI_GATEWAY_PORT", "443")
UNIFI_GATEWAY_BASE_URL = f"https://{UNIFI_GATEWAY_HOST}:{UNIFI_GATEWAY_PORT}/proxy/network/integration"

# Initialize FastMCP server
mcp = FastMCP("unifi")
When we run our server later, this will make it easy to configure if you have a gateway.
Helper Functions
This entire MCP server is simply encapsulating the REST API, which means lots of duplicate code. To keep things DRY let’s add a helper function for making the API calls.
def unifi_request(path: str, method: str, params: Optional[Dict[str, Any]] = None, data: Optional[Dict[str, Any]] = None):
    """
    Make a request to the Unifi API

    Args:
        path (str): The path to the API endpoint
        method (str): The HTTP method to use
        data (Optional[Dict[str, Any]], optional): The data to send to the API. Defaults to None.

    Returns:
        dict: The response JSON from the API
    """
    url = f"{UNIFI_GATEWAY_BASE_URL}/{path}"
    headers = {
        "Content-Type": "application/json",
        "X-API-Key": UNIFI_API_KEY,
    }
    response = requests.request(method, url, headers=headers, params=params, data=data, verify=False)
    return response.json()
Defining Resources
Now, the fun part! We are going to define some resources for our server. In MCP, resources allow the server to expose data and content that can be read by the clients (like Claude) and used as context for LLMs.
Each resource has a URI that follows this format:
[protocol]://[host]/[path]Using the UniFi Network API, we can read data about the UniFi sites, which are at the top of our UniFi hierarchy. Within a site, we can also read data about adopted devices, connected clients, etc.
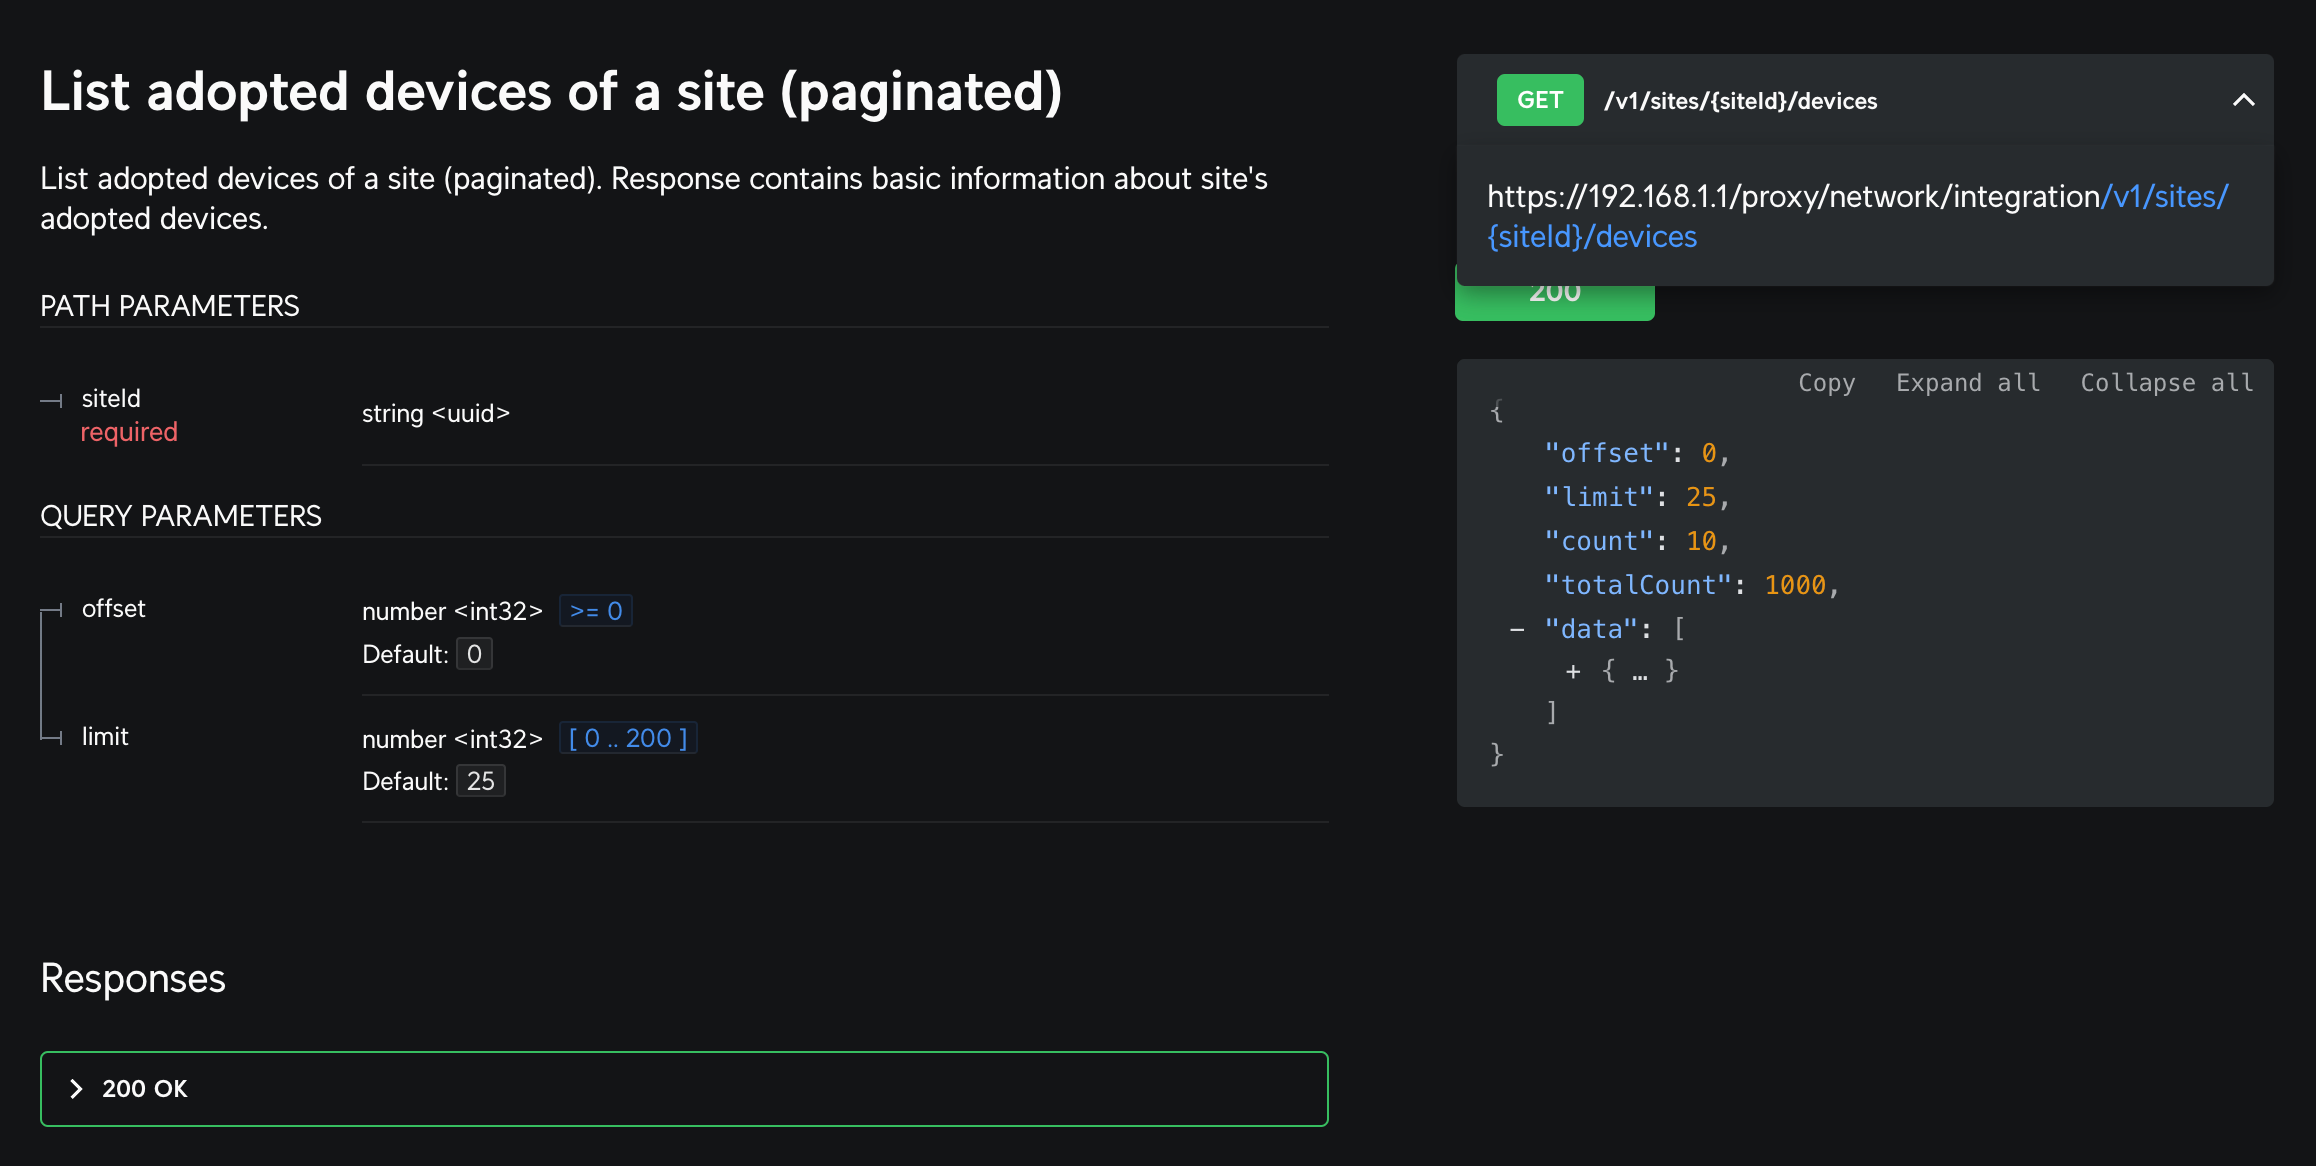
So, for the following endpoint, we could come up with a resource and URI like sites://{site_id}/devices
To implement resources in our Python code, we’ll make use of the server’s decorators like @mcp.tool() and @mcp.resource().
@mcp.resource("sites://")
async def list_sites() -> List[Dict[str, Any]]:
    """List all sites in the Unifi controller"""
    sites = []
    params = {"limit": 200, "offset": 0}

    while True:
        resp = unifi_request("/v1/sites", "GET", params=params)
        sites.extend(resp["data"])
        if resp["count"] != resp["limit"] or resp["totalCount"] <= len(sites):
            break
        params["offset"] += resp["limit"]

    return sites


@mcp.resource("sites://{site_id}/devices")
async def list_devices(site_id: str) -> List[Dict[str, Any]]:
    """
    List all devices in a specific Unifi site

    Args:
        site_id (str): The ID of the site to list devices for

    Returns:
        List[Dict[str, Any]]: List of devices in the site
    """
    devices = []
    params = {"limit": 200, "offset": 0, "site_id": site_id}

    while True:
        resp = unifi_request(f"/v1/sites/{site_id}/devices", "GET", params=params)
        devices.extend(resp["data"])
        if resp["count"] != resp["limit"] or resp["totalCount"] <= len(devices):
            break
        params["offset"] += resp["limit"]

    return devices
Running the MCP Dev Server
Finally, we’re ready to run our MCP server! We just need an entrypoint in the code, so don’t forget to add:
if __name__ == "__main__":
    # Initialize and run the server
    mcp.run(transport='stdio')
You can run your MCP server standalone just to test that it starts up successfully, with uv run mcp dev main.py. This will also start the MCP Inspector at http://localhost:5173 which is great for testing and debugging.

Configuring for Goose
If you’d like to use Block’s Goose AI Agent, open Goose and go to Settings » Extensions » Add custom extension.
In the form that prompts you, fill in the following details, and be sure to change “username” to your own username as used by your machine:
ID: unifi
Name: unifi
Description: Get information about your UniFi network
Command:
/Users/username/.local/bin/uv --directory /Users/username/path/to/mcp-server-unifi run main.py
Environment Variables:
UNIFI_API_KEY: input your API key
Click Add to save the changes and you’ll have successfully added the MCP server to Goose for local use!

No need to restart Goose, go ahead and try it out:


Configuring for Claude Desktop
If you’d like to configure your MCP for use with Claude Desktop app, open Claude and go to Settings » Developer » Edit Config.
This will open a claude_desktop_config.json file in a text editor. If it opens your file explorer / Finder application, just open the file it has selected automatically.
Paste the following into this configuration file, and be sure to change “username” to your own username as used by your machine.
{
    "mcpServers": {
        "unifi": {
            "command": "/Users/username/.local/bin/uv",
            "args": [
                "--directory",
                "/Users/username/path/to/mcp-server-unifi",
                "run",
                "main.py"
            ]
        }
    }
}
Save your changes to the file, then restart the Claude Desktop application and give it a try!
Conclusion
Hopefully, you’ve enjoyed yet another MCP blog. Yes, MCP is very popular right now. While it may not be as “game-changing” as tech influencers will claim, it’s certainly very easy to use and build upon—and standards are almost always a good thing!
The source code for this is available on GitHub (although not accepting PRs as it is a demo only): https://github.com/zcking/mcp-server-unifi.
I want to hear from you though…what do you think about MCP? Can you think of anything you’d like an MCP server for but doesn’t exist yet? Tip: check out this growing awesome-list of MCP servers and subscribe to MakeWithData for more!